How To Thread A Janome Sewing Machine Model 2212

How To Thread A Janome Sewing Machine Model 2212


Learn how to thread your Janome 2212 sewing machine in this easy step-by-step tutorial.


This tutorial will guide you through the process, ensuring that you can effortlessly prepare your Janome 2212 for your sewing projects.

With clear and concise instructions, you’ll be threading your machine like a pro in no time, making your sewing experience a smooth and enjoyable one.


Threading the Machine

Raise the take–up lever to its highest position by turning the handwheel toward you.
Raise the presser foot.
Place a spool on the spool pin as shown on the top of the machine, with thread coming from the back of the spool.


Learn how to thread your Janome 2212 sewing machine in this easy step by step tutorial.

  1. Draw the thread into the thread guide using both hands.
  2. While holding the thread near the spool, draw the thread down into the tension area and then around the check spring holder.
  3. Firmly draw the thread up and through the take–up lever from right to left.
  4. Then draw the thread down and slip it into the lower thread guide.
  5. Draw the thread down and slip it into the needle bar thread guide on the left.
  6. Thread the needle eye from front to back.

Note
You can also use the built-in needle threader.


Step By Step How To Thread A Janome Sewing Machine Model 2212


You can get the complete instruction manual here. Includes: Adjusting tensions, bobbin winding, changing needles, zigzag, using the free-arm extension table, and much more.

Complete Guide: Singer Featherweight 221 Adjusters Manual PDF Download

 Singer Featherweight 221 Sewing Machine

Singer Featherweight 221 Adjusters Manual PDF Download

If you own a Singer 221, also known as the Singer Featherweight sewing machine, then you know how important it is to have the right resources at your fingertips. The Singer 221 Adjusters Manual is a comprehensive guide that can help you get the most out of your machine. Whether you are a seasoned pro or just starting out, this manual has everything you need to make your sewing experience a success.

In this section, we will provide a complete guide on how to download the Singer 221 Adjusters Manual in PDF format. We will also give you an overview of what this manual contains and how to effectively use it to make adjustments to your Singer Featherweight sewing machine.

Key Takeaways:

  • The Singer 221 Adjusters Manual covers a wide range of information, including maintenance and adjustment procedures, and troubleshooting common issues.
  • A valuable resource for Singer Featherweight sewing machine owners.
  • The manual can be downloaded in PDF format for easy access and reference.
  • Understanding the different sections and functions of the manual can help you optimize your sewing experience.
  • Having access to the Singer 221 service Manual can save you time and money by enabling you to make your own adjustments and repairs.
  • Whether you prefer to view the manual online, download a PDF version, or visit a specialized shop, there are various options available to access this valuable resource.

What’s inside the Singer Featherweight 221 Adjusters Manual

I’m sure many of you have purchased a service manual before without knowing what information is contained inside.

Below is a summary of what you will find included:

  • Timing the hook.
  • Motor lubrication.
  • Needle bar height.
  • Adjusting needle thread tension.
  • Adjusting the bobbin winder pressure.
  • Setting feed dog height.
  • Removal and replacing the bobbin case.
  • Hints for adjusters and mechanics.
  • Sewing difficulties.
  • Oiling machine. (Includes the machine top and the bottom).
  • Two full pages of full-blown motor diagrams.
  • Wiring diagram.
  • Includes great diagrams showing you step-by-step how to set your rotating hook.
  • Parts list with diagrams. (Two pages)

How to Use the Singer 221 Service and Adjusters Manual

When it comes to maximizing the potential of your Singer Featherweight sewing machine, the Singer 221 Adjusters Manual is an essential resource.

The manual is divided into sections allowing you to use just the information you need.

We have included just a few examples below from the manual.


Parts Diagrams

Singer 221 Featherweight Parts Diagram

A very useful thing to have is a parts diagram for your machine. This not only allows you to purchase a part if you need one but also helps you to understand the location of what’s in your machine. You will be much more confident when making any adjustments or performing any service.

221-1, 221K, 221K1, 221K4, 221K5


Proper Oiling Techniques

Singer 221 Featherweight Oiling Instructions

Oiling your Singer 221 is essential to ensure it runs smoothly and efficiently. Here are some tips to keep in mind:

  • Always use high-quality sewing machine oil. There are many types available but just a lightweight sewing machine oil will do fine.
  • Apply a drop of oil to each oiling point, then run the machine for a few minutes to distribute the oil evenly.
  • Wipe away any excess oil to prevent it from staining your fabric.

Removing and Replacing the Handwheel

Singer 221 Featherweight Remove And Replace Hand Wheel

If you need to remove the hand wheel of your Singer 221 for maintenance or repair, follow these steps:

REMOVAL
1. Loosen the motor mounting screw and remove the belt.
2. Hold the handwheel and loosen the stop motion clamp
screw, Fig. 46, by turning toward the left.
3. Loosen the stop screw, Fig. 46, until the end clears the stop
motion washer. Then turn the clamp screw toward
the left and out of the bushing.
4. Remove the stop motion clamp washer, Fig. 47, and
slide the hand wheel out and off the bushing.


REPLACEMENT:
1. Replace handwheel on the bushing.
2. Replace stop motion clamp washer with lugs inserted
in recess provided for them in the bushing.
3. Replace clamp screw and then tighten stop screw.
NOTE: If stitching mechanism is not released
when stop motion clamp screw is loosened, remove
stop motion clamp washer and rotate it 180  degrees.


Where can I find the service manuals for the Singer Featherweight 221?

Viewing the Manual Online

If you prefer to view the Singer 221 Adjusters Manual online, there are several websites that offer these versions of the manual. Simply search for “Singer 221 Featherweight Sewing Machine Service Manual” in your preferred search engine, and you’ll find numerous options to choose from.

Downloading a PDF Version

For those who prefer a downloadable version of the manual, there are also several options available. Some websites may offer a PDF version of the manual for free, while others may require a purchase. Simply search for “Singer 221 Featherweight Sewing Machine Service Manual” in your preferred search engine, and you’ll find a wide selection of options to choose from. You can also print a hard copy from the PDF manual also.

Visiting a Specialized Shop

If you prefer a physical copy of the manual, you may want to consider visiting a specialized shop that sells Singer Featherweight sewing machines and accessories. Many of these shops offer original copies of the Singer 221 Adjusters Manual, as well as other helpful resources for maintaining and repairing your machine.

Conclusion

In conclusion, the Singer 221 Adjusters Manual in PDF format is a highly valuable resource for every owner of the Singer Featherweight sewing machine. After a short time looking over your manual you will be more confident than ever to perform simple adjustments and maintenance on your machine.

A great addition to your Singer Owner’s handbook.

FAQ

Can I download the Singer 221 Adjusters Manual in PDF format?

Yes, you can download the Singer 221 Adjusters Manual in PDF format. It is available for download on various websites that offer sewing machine manuals.


Is the Singer 221 Adjusters Manual suitable for both beginners and experienced users?

Yes, the Singer 221 Adjusters Manual is suitable for both beginners and experienced users. It provides detailed instructions that are easy to understand and follow, making it accessible for users at any skill level.

What information does the Singer 221 Adjusters Manual cover?

The Singer 221 Adjusters Manual covers a wide range of information, including maintenance and adjustment procedures, understanding various parts and functions, and more. It is a comprehensive resource for Singer featherweight 221 222 owners.


How can I access the Singer 221 Adjusters Manual?

There are several ways to access the Singer 221 Adjusters Manual. You can view it online, download a PDF version, or visit a specialized shop that carries sewing machine manuals.

You can also find the service/adjusters manual here.

How To Thread Your Kenmore 385.1950180 – 385.1950280 Sewing Machine

How To Thread Your Kenmore 385.1950180 – 385.1950280 Sewing Machine
 

Are you struggling to thread your Kenmore sewing machine? Don’t worry, threading a sewing machine can be tricky, especially for beginners. However, with the right instructions, you can thread your Kenmore sewing machine like a pro in no time.

In this guide, we will provide you with step-by-step instructions on how to thread your sewing machine.

Before we start, make sure that your sewing machine is turned off and unplugged for your safety.

Key Takeaways

  • Threading your home sewing machine can seem intimidating, but with the right instructions, it can be easy.
  • Before beginning, ensure your sewing machine is turned off and unplugged.
  • Follow the step-by-step instructions carefully to ensure smooth and efficient sewing.
  • Always refer to your sewing machine’s manual for additional guidance and troubleshooting tips.
  • With practice, you’ll be able to thread your Kenmore sewing machine quickly and confidently.


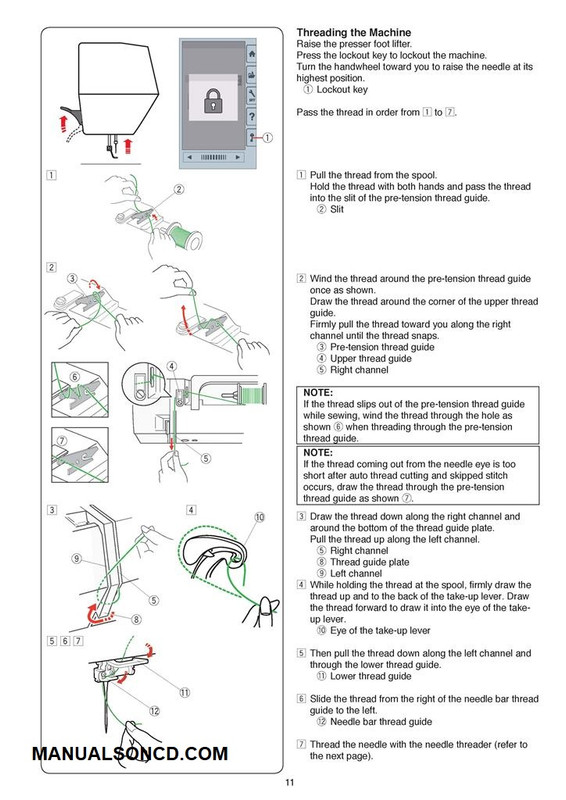
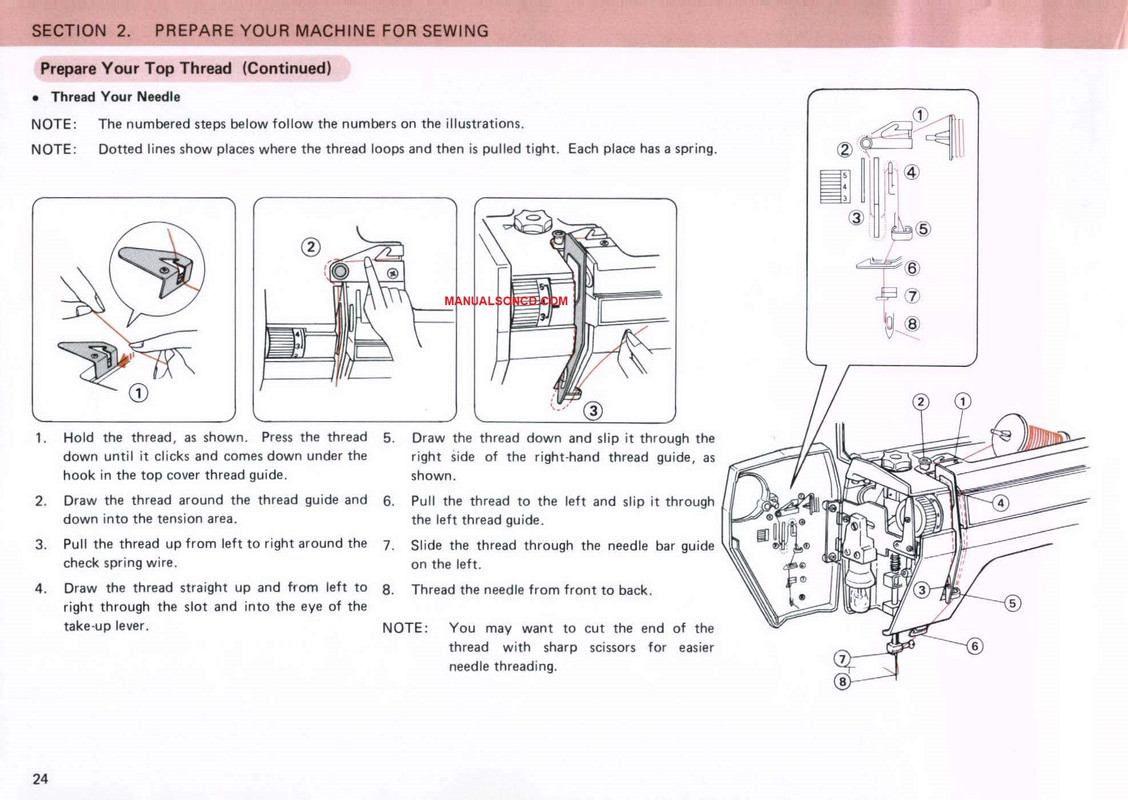
Step-by-Step Guide To Thread Your Machine

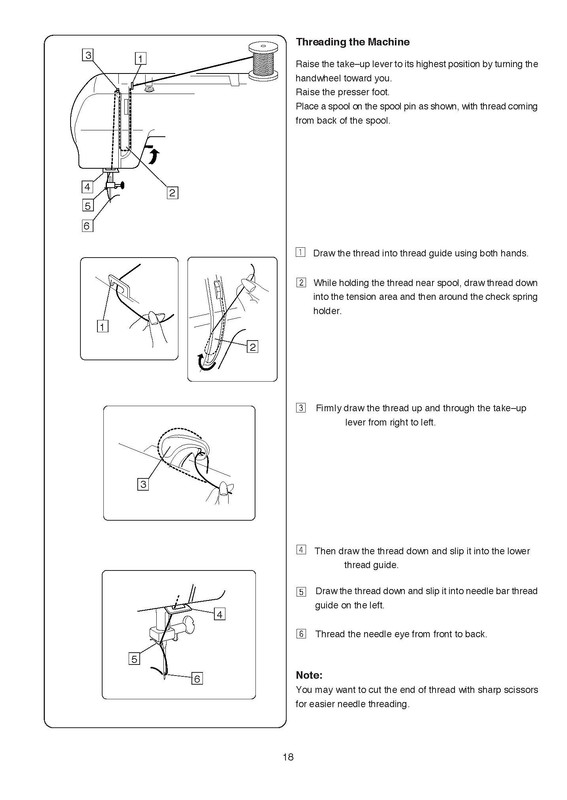
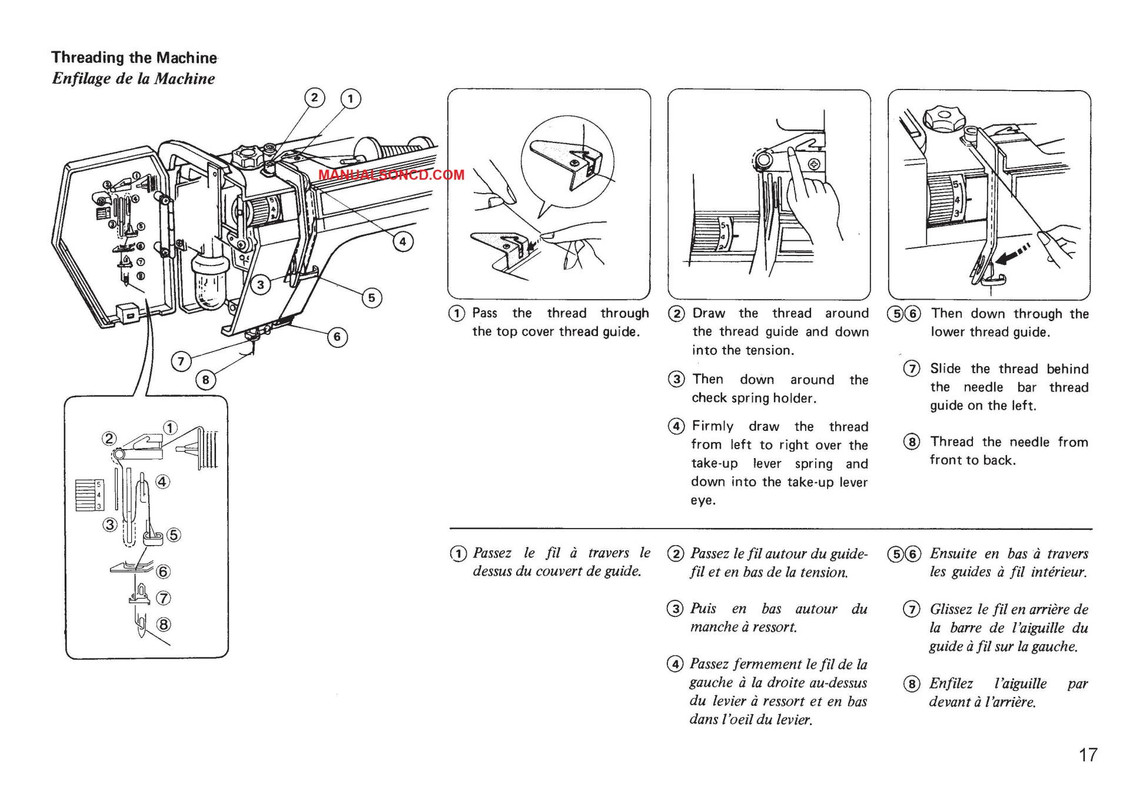
NOTE: The numbered steps below follow the numbers on the illustrations.
NOTE: Dotted lines show places where the thread loops and then is pulled tight. Each place has a spring.

Begin by turning off your machine and unplugging it from the electrical outlet for safety.

Place your thread spool on the spool pin and secure it with a spool cap.

1. Hold the thread as shown. Press the thread down until it clicks and comes down under the hook in the top cover thread guide.

2. Draw the thread around the thread and down into the tension area.

3. Pull the thread up from left to right around the check spring wire.

4. Draw the thread straight up and from left to right through the slot and into the eye of the take-up lever.

5. Draw the thread down and slip it through the right side of the right-hand thread guide, as shown.

6. Pull the thread to the left and slip it through the left thread guide.

7. Slide the thread through the needle bar guide on the left.

8. Thread the needle from front to back.

NOTE: You may want to cut the end of the thread with sharp scissors for easier needle threading.

With these easy steps, you can thread your Kenmore 385.1950180 – 385.1950280 sewing machine with ease.

How to Thread Your Kenmore 385.1950180 – 385.1950280 Sewing Machine

Troubleshooting Tips For You Kenmore Sewing Machine

If you are experiencing any issues while threading your Kenmore sewing machine, there are several troubleshooting tips that you can follow to resolve common problems.

Tangled Thread

If the thread on your machine is getting tangled, try adjusting the tension dial. If the tension is too loose or too tight, it can cause the thread to tangle. Make sure to also check that the bobbin is correctly installed and threaded.

Broken Needle

If your needle keeps breaking, double-check that it is the correct size and type for your fabric. A needle that is too small or too weak for the fabric can easily break. Additionally, make sure that the needle is inserted correctly and that there are no burrs on the needle plate.

Skipped Stitches

If your machine is skipping stitches, ensure that the needle is inserted correctly and that you are using the correct needle for the type of fabric you are sewing. Also, make sure that the thread is correctly threaded through the needle and that the tension is properly adjusted.

Thread Bunching Up

In the case of thread bunching up on the underside of your fabric, make sure that you have properly threaded the bobbin and that it is wound tightly and inserted correctly. Also, check that the upper thread tension is correctly set for the type of fabric you are using.

By following these troubleshooting tips, you can resolve common issues and ensure that your Kenmore sewing machine operates smoothly and efficiently.


Conclusion:

Threading your Kenmore sewing machine is no longer a daunting task. By following the step-by-step guide provided in Section 1, you can quickly and efficiently thread your machine to ensure smooth sewing.

In addition, if you encounter any issues while threading your Kenmore sewing machine, Section 2 provides troubleshooting tips to help you resolve common problems. These tips are designed to help you overcome any obstacles that may arise during the threading process, ensuring that your sewing projects go smoothly.

With the help of this comprehensive guide, you can confidently thread your sewing machine and enjoy precision sewing. Remember to refer to this guide whenever you need help with threading your machine.


You can find the complete sewing machine instruction manual here.

How to Thread Your Janome New Home DX2015 Sewing Machine

How to Thread Your Janome New Home DX2015 Sewing Machine.


How to Thread Your Janome New Home DX2015 Sewing Machine

Note: Before starting, ensure that the machine is turned off and unplugged for safety.

Threading the machine:

Take the spool pin holder and insert it into the hole at the top of the machine.

Raise the thread take-up lever to the highest point by turning the handwheel towards you.

Raise the presser foot with the presser foot lifter and pass the thread in the order from 1 to 8.

1. Pass the thread through the top cover thread guide.
2. Draw the thread around the thread guide and down into the tension.
3. Then down around the check spring holder.
4. Firmly draw the thread from left to right over the take-up lever and down into the take-up lever eye.
5-6. Then down through the lower thread guide.
7. Slide the thread behind the needle bar thread guide on the left.
8. Thread the needle from front to back.

4. Final Steps:

a. Hold the upper thread and manually turn the handwheel toward you to lower the needle into the fabric.
b. Pull the upper thread slightly to bring up the bobbin thread.
c. Hold both threads together and pull them towards the back of the machine, under the presser foot.
d. Your Janome New Home DX2015 Sewing Machine is now threaded and ready to sew!

Remember to consult the machine’s user manual for additional guidance and specific instructions related to your model. Happy sewing!

How to Thread Your Janome New Home DX2015 Sewing Machine


You can find the complete instruction manual here.

Elna 830 Expressive Sewing Machine Threading Instructions

Elna 830 Expressive Sewing Machine Threading Instructions.


Elna 830 Expressive Sewing Machine Threading Instructions

Note: Before starting, ensure that the machine is turned off and unplugged for safety.

Threading the Machine:

Raise the presser foot lifter
Press the lockout key to lockout the machine
Turn the handwheel toward you to raise the needle at its highest position.
(Fig 1) Lockout key
Pass the thread in order from (1 to 7)
.
1. Pull the thread from the spool.
Hold the thread with both hands and pass the thread
into the slit of the pre-tension thread guide. (Fig 2)

2. Wind the thread around the pre-tension thread guide once as shown.
Draw the thread around the corner of the upper thread guide.
Firmly pull the thread toward you along the right channel until the thread snaps.
(Fig 3) Pre-tension thread guide
(Fig 4) Upper thread guide
(Fig 5) Right channel.

NOTE:
If the thread slips out of the pre-tension thread guide
while sewing, wind the thread through the hole as
shown (Fig 6) when threading through the pre-tension
thread guide.

NOTE:
If the thread coming out from the needle eye is too
short alter auto thread cutting and skipped stitch
occurs, draw the thread through the pre-tension
thread guide as shown (Fig 7).

3. Draw the thread down along the right channel and around the bottom of the thread guide plate.
Pull the thread up along the left channel.
(Fig 5) Right channel
(Fig 8) Thread guide plate
(Fig 9 Left channel.

4. While holding the thread at the spool, firmly draw the thread up and to the back of the take-up lever.
Draw the thread forward to draw it into the eye of the take up lever.
(Fig 10) Eye of the take-up lever.

5. Then pull the thread down along the left channel and through the lower thread guide.
(Fig 11) Lower thread guide.

6. Slide the thread from the right of the needle bar thread guide to the left.
(Fig 12) Needle bar thread guide.

7. Thread the needle with the needle threader (refer to the next page).

Remember to consult the machine’s user manual for additional guidance and specific instructions related to your model. Happy sewing!

Elna 830 Expressive Sewing Machine Threading Instructions


You can find the complete instruction manual here.