
Kenmore 158.1212180 Sewing Machine Instruction Manual
$5.95
This is a download manual. Please check your email after purchasing.
Description
Kenmore 158.1212180 Sewing Machine Instruction Manual.
Includes:
Setting up your machine.
Threading machine.
Bobbin winding.
Changing needle.
Adjusting thread tension.
Winding, Inserting, and threading bobbin.
pressure regulator.
Change presser feet.
Installing extension table.
Zigzag stitching.
Button sewing.
Checking performance problems.
Changing light bulb.
Oiling the Machine.
Much more.
35 page instruction/owners manual.
PDF download.
Kenmore 158.1212180 Sewing Machine Instruction Manual.
You can find more Kenmore sewing manuals here.
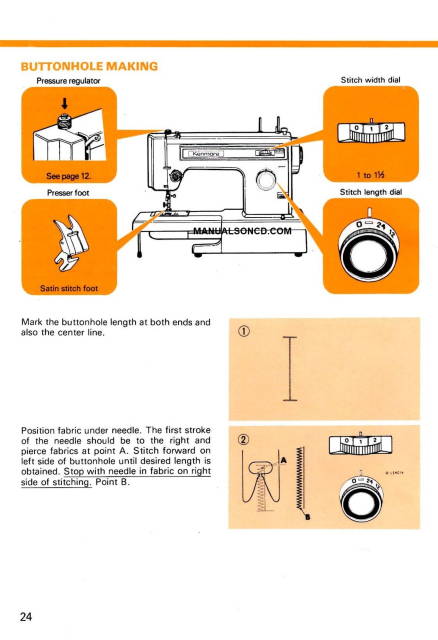
Buttonhole Making
See photo 3 provided for this example.
Mark the buttonhole length at both ends and also the center line.
Position fabric under needle. The first stroke of the needle should be to the right and
pierce fabrics at point A.
Stitch forward on left side of buttonhole until desired length is
obtained.
Stop with needle in fabric on right of stitching. Point B.
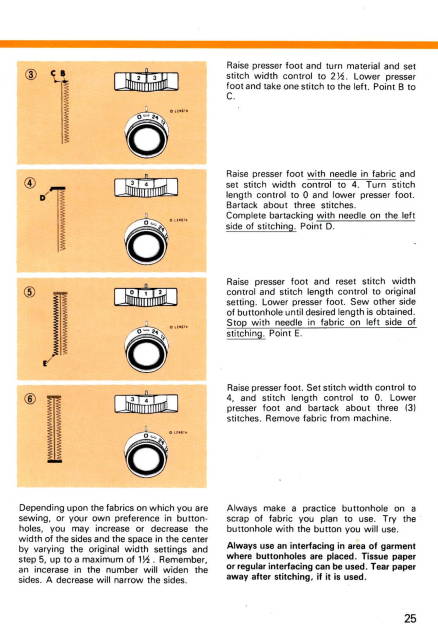
See photo 4 provided for this example.
Raise presser foot and turn material and set stitch width control to 2 ½.
Lower presser foot and take one stitch to the left. Point B to C.
Again raise presser foot with needle in fabric and set stitch width control to 4. Turn stitch length control to O and lower presser foot. Bartack about three stitches.
Complete bartacking with needle on the left side of stitching. Point D.
Next step raise presser foot and reset stitch width control and stitch length control to original setting. Lower presser foot. Sew other side of buttonhole until desired length is obtained. Stop with needle in fabric on left side of stitching. Point E.
Finally raise presser foot. Set stitch width control to 4, and stitch length control to 0. Lower presser foot and bartack about three (3) stitches. Remove fabric from-machine.
Always make a practice buttonhole on a scrap of fabric you plan to use. Try the · buttonhole with the button you will use.
Always use an interfacing in area of garment where buttonholes are placed. Tissue paper or regular interfacing can be used. Tear paper away after stitching, if it is used.
Depending upon the fabrics on which you are sewing, or your own preference in buttonholes, you may increase or decrease the width of the sides and the space in the center by varying the original width settings and step 5, up to a maximum of 1½. Remember, an increase in the number will widen the sides. A decrease will narrow the sides.
Reviews
There are no reviews yet