Singer 301 301A Sewing Machine Threading Instructions

Singer 301 301A Sewing Machine Threading Instructions


UPPER THREADING

See Figs. 6 and 7
Raise take-up lever 8 to its highest point,
Place spool of thread on spool pin 1
Lead thread into thread guide 2
Into thread guide 3
Down into thread guide 4
Down, under and from right to left between tension discs 5 Hold spool tightly and pull thread up against ta_ke-up spring 7 until it enters retaining fork 6
Pass thread up into thread guide 4
From right to left through hole in take-up lever 8
Down through eyelet 9
Into wire thread guide 10
Into wire thread guide 11
Into guide 12 on needle clamp
From right to left through eye of needle 13.
Draw about two inches of thread through eye of needle.

Singer 301 301A Sewing Machine Threading Instructions

You can find the complete instruction manual here.

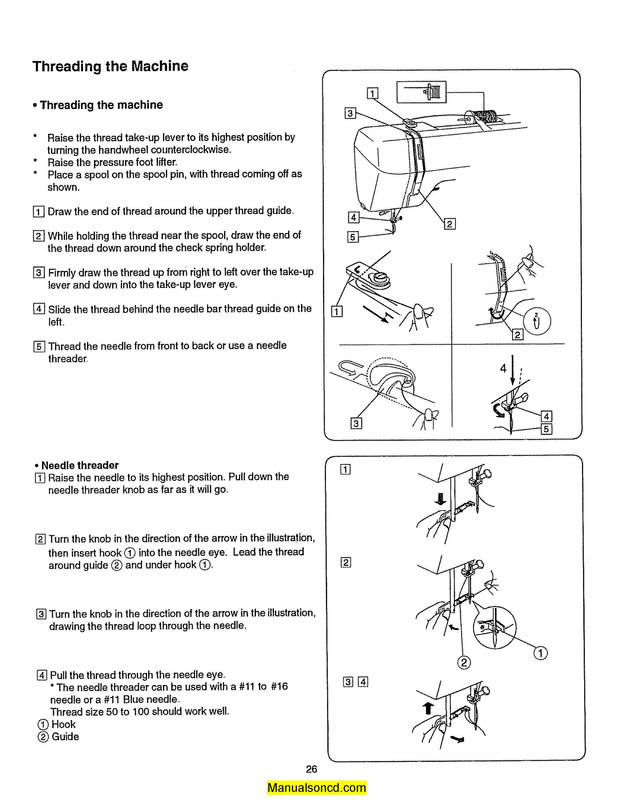
Kenmore 385.17324 Sewing Machine Threading Instructions

Kenmore 385.17324 Sewing Machine Threading Instructions


1. Raise the needle take-up lever to the highest position by turning the hand wheel counterclockwise.

2. While holding the thread near the spool, draw the end of the thread down around the check spring holder.

3. Firmly draw the thread up from right to left over the take-up lever and down into the take-up eye.

4. Slide the thread behind the needle bar thread guide on the left.

5. Thread the needle from from to back or use a needle threader.

Kenmore 385.17324 Sewing Machine Threading Instructions

You can find the complete instruction manual here.

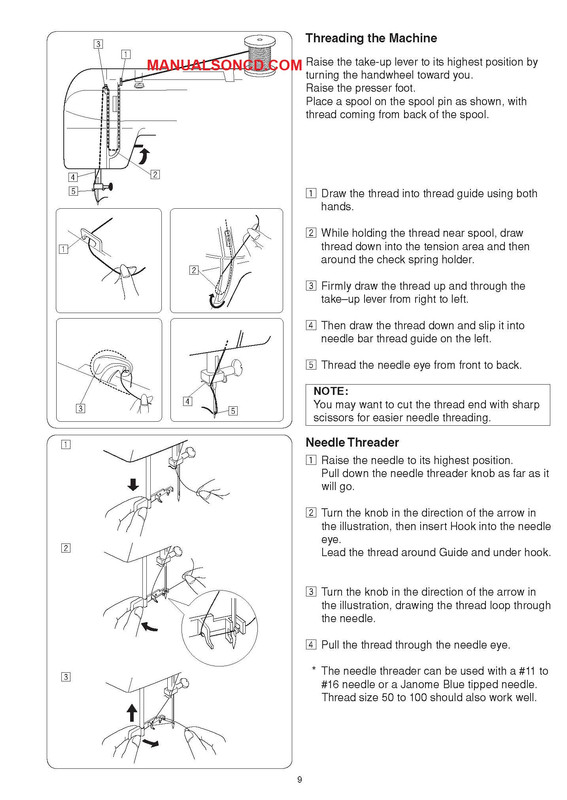
New Home 2014LE Sewing Machine Threading Instructions

New Home 2014LE Sewing Machine Threading Instructions


Raise the needle take-up lever to the highest position by turning the balance wheel towards you.

Raise the presser foot with the presser foot lifter and pass the thread in the order of 1 to 5.

1. Lead the thread from the spool and pass it through the thread guide. Then draw it down around the right slot.

2. Guide the thread down around the bottom of the thread guide plate from right to left and then draw it upwards.

3. Firmly draw the thread from the right to left over the take-up lever and down into the take-up lever eye.

Then guide it down around the left slot.

4. Slide the thread behind the needle bar thread guide on the left.

5. Thread the needle from front to back.

New Home 2014LE Sewing Machine Threading Instructions

You can find the complete instruction manual here.

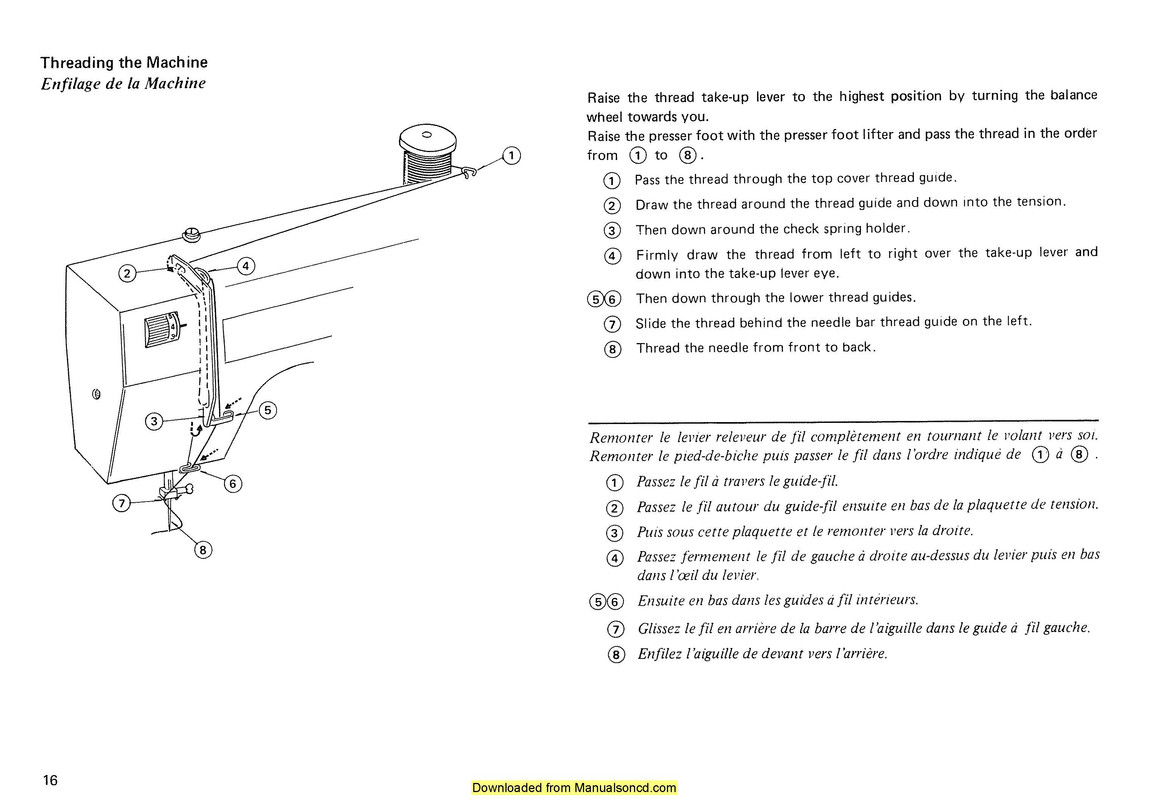
Janome 109 – 110 Sewing Machine Threading Instructions

Janome 109 – 110 Sewing Machine Threading Instructions


 Raise the needle take-up lever to the highest position by turning the balance wheel towards you.

 Raise the presser foot with the presser foot lifter and pass the thread in the order below.

1. Pass the thread through the top cover thread guide.

2. Draw the thread around the thread guide and down into the tension.

3. Then down around the check spring holder.

4. Firmly draw the thread from the left to right over the take-up lever and down into the take-up lever eye.

5. Then down through the lower thread guide.

6. Slide the thread behind the needle bar thread guide on the left.

7. Thread the needle from front to back.

Janome 109 – 110 Sewing Machine Threading Instructions

You can find the complete instruction manual here.


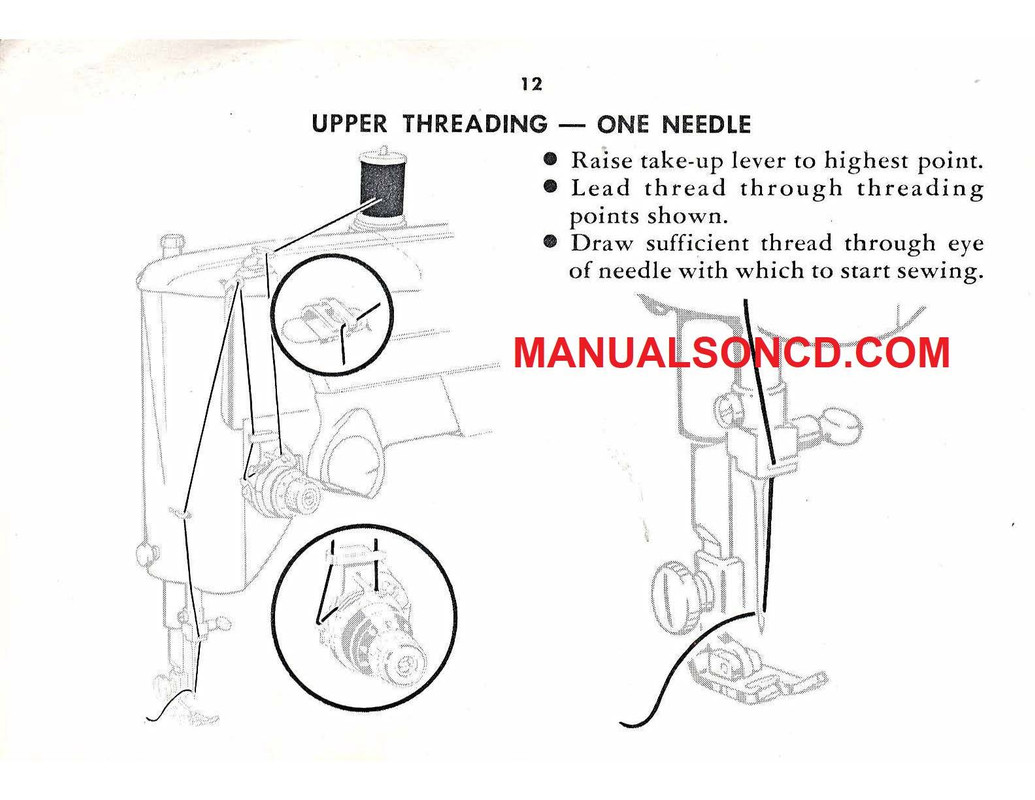
Singer 20U Sewing Machine Threading Instructions

Singer 20U Sewing Machine Threading Instructions.

Threading the needle

1. Turn the hand wheel toward you to raise take up lever to its highest position.
2. Raise the presser foot.
3. Lead thread from the thread unwinder through all through the threading points shown.
Thread the needle from the front to the back.

4. Draw about 3 inches of thread through the eye of the needle.

If you need the complete instruction manual, you can find it here.

Singer 20U Sewing Machine Instruction Manual.


Needle position selector

Left, Center and right needle position settings are available for placement of both straight and zigzag stitching.
To position, push lever in and move to the desired setting.
Center settings is preferred for normal sewing.
Setting left and right are only used when special placement of stitching is desired.
For example: buttonholes, button sewing.
Do not make any needle position adjustment while the needle is in the fabric.


How to control the width of zigzag stitch

The two thumb screws provided on front of arm allow you to control the width of Zigzag stitches.
The thumb screw A is used to control the width of the wider zigzag stitch and the thumb screw B to control the narrow or zig-zag stitch.

1. To obtain minimum to maximum width zigzag stitches, first loosen thumb screw B to permit the stitch width regulator C to return to its zero position and retighten thumb screw B.
Then loosen thumb screw A, turn stitch width regulator C clockwise as far as it will go and while holding the regulator C in this position, retighten thumb screw A.
You can now regulate the stitch width regulator within the range of 0 to 9mm.

2. To make narrower zigzag stitches, for example, a 0 to 5 mm width zigzag stitches, loosen thumb screws A and B and retighten thumb screw B as explained above.
Then turn stitch width regulator C to 5mm settings and while holding regulator C, retighten thumb screw A.

Singer 20U Sewing Machine Threading Instructions