How To Thread A New Home Janome Sewing Machine Model 576

How to thread a new home Janome sewing machine model 576.


Learn how to thread your New Home Janome 576 sewing machine in this easy step-by-step tutorial.


Threading the Machine

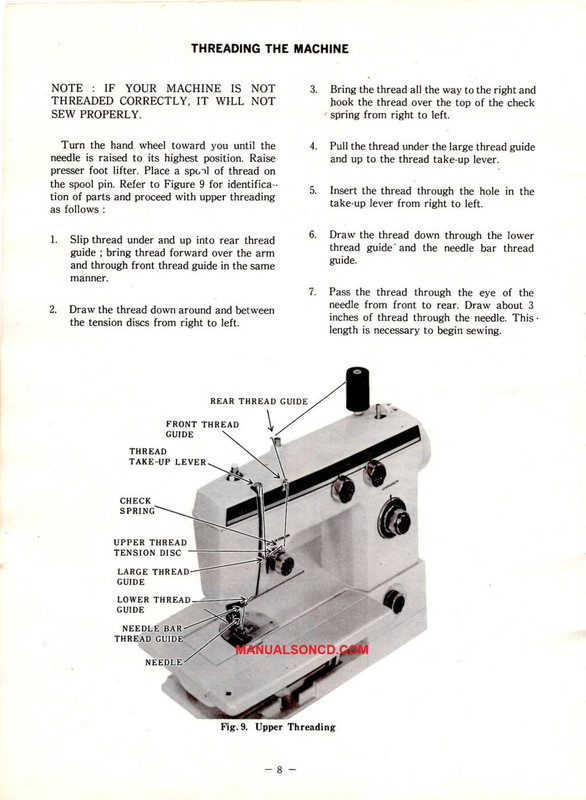
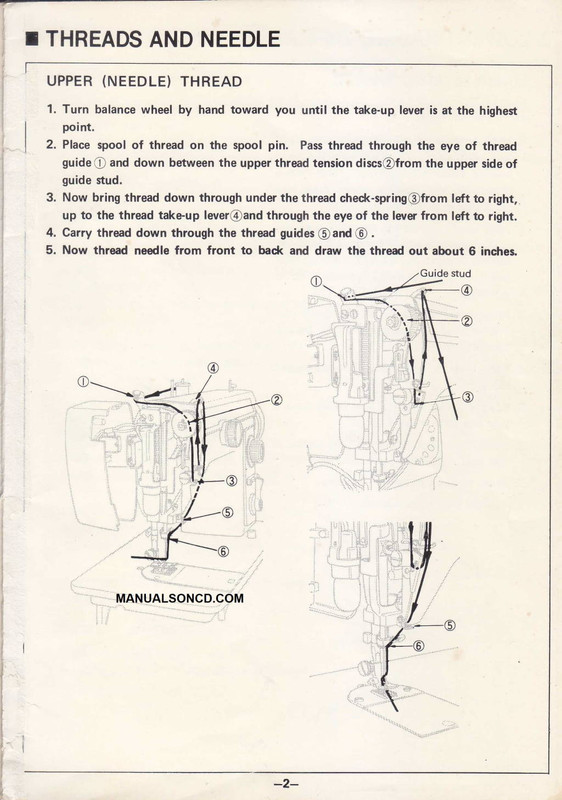
Raise the take-up lever (6) to the highest point by turning the balance wheel toward you.
Place a spool of thread on the spool pin.
Pass the thread through upper arm thread guides ( 1 & 2), downwards around tension discs (3) from right to left, up over the tension thread guard (4) from behind, through the loop of the take-up spring ( 5), up and through the hole in the take-up lever (6), down through thread guides (7 & 8) and into the thread guide (9) at the lower end of the needle bar.
Then pass through the eye of the needle from left to right. Draw about two inches of thread through the eye of the needle.

Hold the upper thread loosely with your left hand.

Turn the balance wheel toward you with your right hand until the needle moves down and up again to the highest point, then stop the balance wheel and pull the upper thread slowly to bring up the lower thread through the needle hole.
Place both ends of the threads back under the presser foot.


How To Thread A New Home Janome Sewing Machine Model 576


TO START SEWING 
Place the cloth under the presser foot.
With the left hand hold loosely both ends of threads and
Turn the balance wheel with the right hand to let the needle penetrate the point from which you wish to start sewing. Lower the presser foot on the cloth and start sewing


You can get the complete instruction manual here. Includes: Adjusting tensions, bobbin winding, changing needles, zigzag, using the free-arm extension table, and much more.


How To Thread A Janome Sewing Machine Model 2212

How To Thread A Janome Sewing Machine Model 2212


Learn how to thread your Janome 2212 sewing machine in this easy step-by-step tutorial.


This tutorial will guide you through the process, ensuring that you can effortlessly prepare your Janome 2212 for your sewing projects.

With clear and concise instructions, you’ll be threading your machine like a pro in no time, making your sewing experience a smooth and enjoyable one.


Threading the Machine

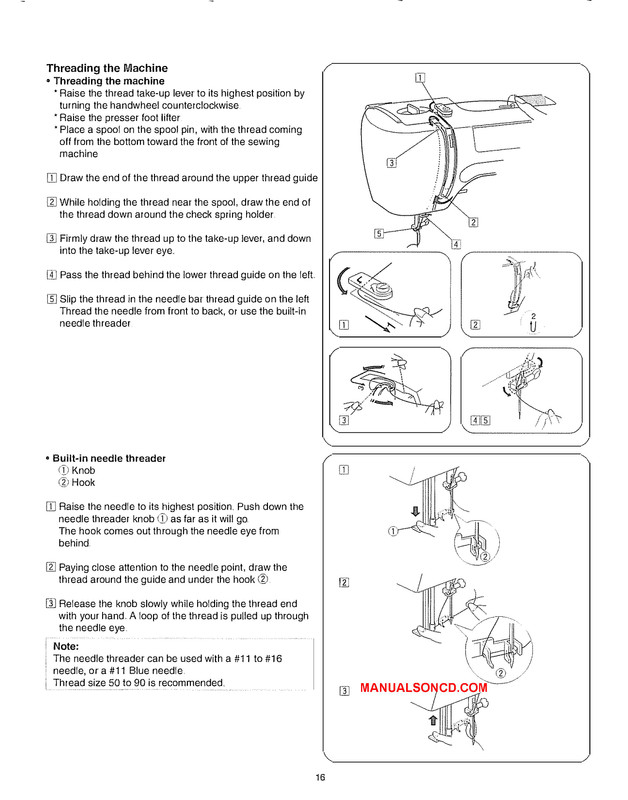
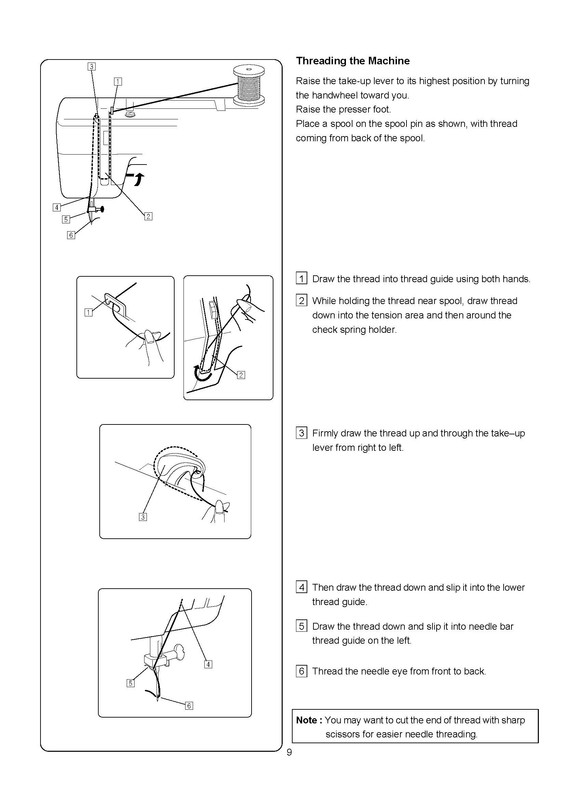
Raise the take–up lever to its highest position by turning the handwheel toward you.
Raise the presser foot.
Place a spool on the spool pin as shown on the top of the machine, with thread coming from the back of the spool.


Learn how to thread your Janome 2212 sewing machine in this easy step by step tutorial.

  1. Draw the thread into the thread guide using both hands.
  2. While holding the thread near the spool, draw the thread down into the tension area and then around the check spring holder.
  3. Firmly draw the thread up and through the take–up lever from right to left.
  4. Then draw the thread down and slip it into the lower thread guide.
  5. Draw the thread down and slip it into the needle bar thread guide on the left.
  6. Thread the needle eye from front to back.

Note
You can also use the built-in needle threader.


Step By Step How To Thread A Janome Sewing Machine Model 2212


You can get the complete instruction manual here. Includes: Adjusting tensions, bobbin winding, changing needles, zigzag, using the free-arm extension table, and much more.

How To Thread Your Kenmore 385.1950180 – 385.1950280 Sewing Machine

How To Thread Your Kenmore 385.1950180 – 385.1950280 Sewing Machine
 

Are you struggling to thread your Kenmore sewing machine? Don’t worry, threading a sewing machine can be tricky, especially for beginners. However, with the right instructions, you can thread your Kenmore sewing machine like a pro in no time.

In this guide, we will provide you with step-by-step instructions on how to thread your sewing machine.

Before we start, make sure that your sewing machine is turned off and unplugged for your safety.

Key Takeaways

  • Threading your home sewing machine can seem intimidating, but with the right instructions, it can be easy.
  • Before beginning, ensure your sewing machine is turned off and unplugged.
  • Follow the step-by-step instructions carefully to ensure smooth and efficient sewing.
  • Always refer to your sewing machine’s manual for additional guidance and troubleshooting tips.
  • With practice, you’ll be able to thread your Kenmore sewing machine quickly and confidently.


Step-by-Step Guide To Thread Your Machine

NOTE: The numbered steps below follow the numbers on the illustrations.
NOTE: Dotted lines show places where the thread loops and then is pulled tight. Each place has a spring.

Begin by turning off your machine and unplugging it from the electrical outlet for safety.

Place your thread spool on the spool pin and secure it with a spool cap.

1. Hold the thread as shown. Press the thread down until it clicks and comes down under the hook in the top cover thread guide.

2. Draw the thread around the thread and down into the tension area.

3. Pull the thread up from left to right around the check spring wire.

4. Draw the thread straight up and from left to right through the slot and into the eye of the take-up lever.

5. Draw the thread down and slip it through the right side of the right-hand thread guide, as shown.

6. Pull the thread to the left and slip it through the left thread guide.

7. Slide the thread through the needle bar guide on the left.

8. Thread the needle from front to back.

NOTE: You may want to cut the end of the thread with sharp scissors for easier needle threading.

With these easy steps, you can thread your Kenmore 385.1950180 – 385.1950280 sewing machine with ease.

How to Thread Your Kenmore 385.1950180 – 385.1950280 Sewing Machine

Troubleshooting Tips For You Kenmore Sewing Machine

If you are experiencing any issues while threading your Kenmore sewing machine, there are several troubleshooting tips that you can follow to resolve common problems.

Tangled Thread

If the thread on your machine is getting tangled, try adjusting the tension dial. If the tension is too loose or too tight, it can cause the thread to tangle. Make sure to also check that the bobbin is correctly installed and threaded.

Broken Needle

If your needle keeps breaking, double-check that it is the correct size and type for your fabric. A needle that is too small or too weak for the fabric can easily break. Additionally, make sure that the needle is inserted correctly and that there are no burrs on the needle plate.

Skipped Stitches

If your machine is skipping stitches, ensure that the needle is inserted correctly and that you are using the correct needle for the type of fabric you are sewing. Also, make sure that the thread is correctly threaded through the needle and that the tension is properly adjusted.

Thread Bunching Up

In the case of thread bunching up on the underside of your fabric, make sure that you have properly threaded the bobbin and that it is wound tightly and inserted correctly. Also, check that the upper thread tension is correctly set for the type of fabric you are using.

By following these troubleshooting tips, you can resolve common issues and ensure that your Kenmore sewing machine operates smoothly and efficiently.


Conclusion:

Threading your Kenmore sewing machine is no longer a daunting task. By following the step-by-step guide provided in Section 1, you can quickly and efficiently thread your machine to ensure smooth sewing.

In addition, if you encounter any issues while threading your Kenmore sewing machine, Section 2 provides troubleshooting tips to help you resolve common problems. These tips are designed to help you overcome any obstacles that may arise during the threading process, ensuring that your sewing projects go smoothly.

With the help of this comprehensive guide, you can confidently thread your sewing machine and enjoy precision sewing. Remember to refer to this guide whenever you need help with threading your machine.


You can find the complete sewing machine instruction manual here.

How to Thread Your Janome New Home DX2015 Sewing Machine

How to Thread Your Janome New Home DX2015 Sewing Machine.


How to Thread Your Janome New Home DX2015 Sewing Machine

Note: Before starting, ensure that the machine is turned off and unplugged for safety.

Threading the machine:

Take the spool pin holder and insert it into the hole at the top of the machine.

Raise the thread take-up lever to the highest point by turning the handwheel towards you.

Raise the presser foot with the presser foot lifter and pass the thread in the order from 1 to 8.

1. Pass the thread through the top cover thread guide.
2. Draw the thread around the thread guide and down into the tension.
3. Then down around the check spring holder.
4. Firmly draw the thread from left to right over the take-up lever and down into the take-up lever eye.
5-6. Then down through the lower thread guide.
7. Slide the thread behind the needle bar thread guide on the left.
8. Thread the needle from front to back.

4. Final Steps:

a. Hold the upper thread and manually turn the handwheel toward you to lower the needle into the fabric.
b. Pull the upper thread slightly to bring up the bobbin thread.
c. Hold both threads together and pull them towards the back of the machine, under the presser foot.
d. Your Janome New Home DX2015 Sewing Machine is now threaded and ready to sew!

Remember to consult the machine’s user manual for additional guidance and specific instructions related to your model. Happy sewing!

How to Thread Your Janome New Home DX2015 Sewing Machine


You can find the complete instruction manual here.

Elna 830 Expressive Sewing Machine Threading Instructions

Elna 830 Expressive Sewing Machine Threading Instructions.


Elna 830 Expressive Sewing Machine Threading Instructions

Note: Before starting, ensure that the machine is turned off and unplugged for safety.

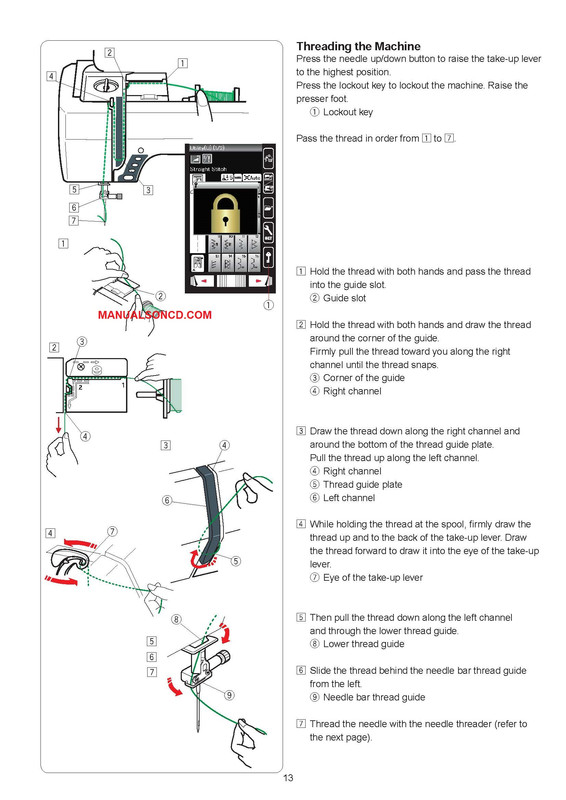
Threading the Machine:

Raise the presser foot lifter
Press the lockout key to lockout the machine
Turn the handwheel toward you to raise the needle at its highest position.
(Fig 1) Lockout key
Pass the thread in order from (1 to 7)
.
1. Pull the thread from the spool.
Hold the thread with both hands and pass the thread
into the slit of the pre-tension thread guide. (Fig 2)

2. Wind the thread around the pre-tension thread guide once as shown.
Draw the thread around the corner of the upper thread guide.
Firmly pull the thread toward you along the right channel until the thread snaps.
(Fig 3) Pre-tension thread guide
(Fig 4) Upper thread guide
(Fig 5) Right channel.

NOTE:
If the thread slips out of the pre-tension thread guide
while sewing, wind the thread through the hole as
shown (Fig 6) when threading through the pre-tension
thread guide.

NOTE:
If the thread coming out from the needle eye is too
short alter auto thread cutting and skipped stitch
occurs, draw the thread through the pre-tension
thread guide as shown (Fig 7).

3. Draw the thread down along the right channel and around the bottom of the thread guide plate.
Pull the thread up along the left channel.
(Fig 5) Right channel
(Fig 8) Thread guide plate
(Fig 9 Left channel.

4. While holding the thread at the spool, firmly draw the thread up and to the back of the take-up lever.
Draw the thread forward to draw it into the eye of the take up lever.
(Fig 10) Eye of the take-up lever.

5. Then pull the thread down along the left channel and through the lower thread guide.
(Fig 11) Lower thread guide.

6. Slide the thread from the right of the needle bar thread guide to the left.
(Fig 12) Needle bar thread guide.

7. Thread the needle with the needle threader (refer to the next page).
Remember to consult the machine’s user manual for additional guidance and specific instructions related to your model. Happy sewing!

Elna 830 Expressive Sewing Machine Threading Instructions


You can find the complete instruction manual here.