
Kenmore 158.17500 – 158.17501 Sewing Machine Manual
$5.95
This is a download manual. Please check your email after purchasing.
Description
Kenmore 158.17500 – 158.17501 Sewing Machine Manual.
Includes:
Threading your machine.
Winding the bobbin.
Picking up the bobbin thread.
Changing needle.
Adjusting thread tension.
Stitch length control lever.
Inserting pattern disc.
Sewing on buttons.
Writing and monogramming.
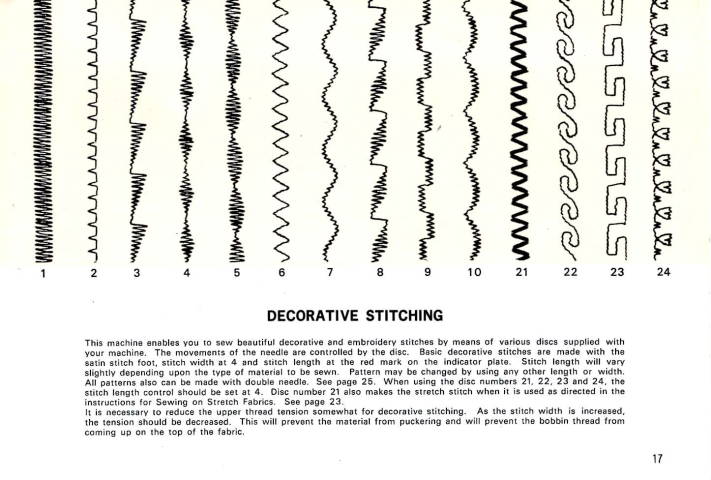
Decorative stitching.
Sewing on plastic films.
Threading the double needle.
Adjusting your sewing machine for good stitches.
Feed dog control.
Sewing light switch.
Oiling.
Cleaning.
Much more!
34 page instruction/owners manual.
Kenmore models:
158.1750
158.17500
158.175001
Kenmore 158.17500 – 158.17501 Sewing Machine Manual.
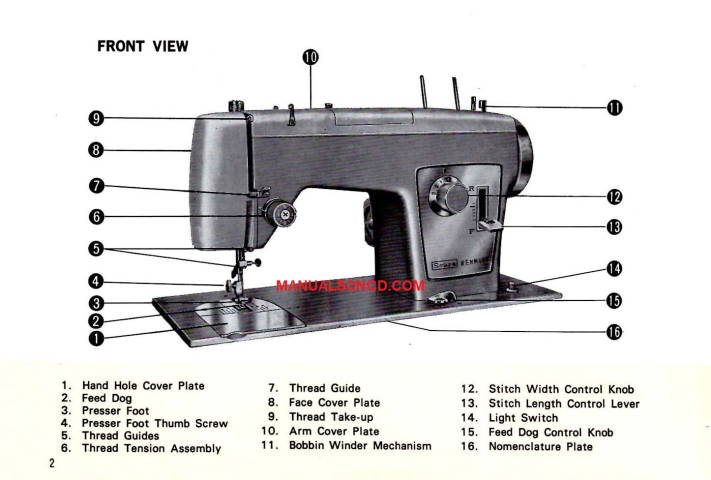
PLACEMENT OF NEEDLE
Raise the needle bar to its highest position by turning hand wheel toward you.
Loosen needle clamp screw.
Hold the needle with flat side away from you.
Slip the needle as far as it will go into the needle clamp, and tighten the needle clamp screw.
SETTING STITCH LENGTH
The stitch length lever controls the stitch length. Set lever to any desired stitch length position between O and 4 by turning knob until the indicator is aligned with the stitch length number desired.
The red mark indicates the settling for a satin stitch. This will vary slightly depending upon the type or material to be sewn. At No. 4 the longest stitch is obtained. The size or stitch you select will depend on the fabric you are sewing. Straight stitching is done with stitch width control on O setting, or by removal of pattern disc.
SETTING STITCH WIDTH
Insert disc 1. Turn the stitch width knob to the desired setting between O and 4 on the knob. Zigzag stitch width increases from 1 to 4. Straight stitching is possible only with control on O setting or by removal of pattern disc.
When sewing with the double needle, the stitch width control must not be advanced beyond 2 1/2 setting.
SEWING ON BUTTONS
Align two boles of button with slot of presser foot and lower foot to hold securely. Drop feed dog. Turn hand wheel by hand until needle point is just above button. Adjust stitch width so that needle will align with a hole of button. Turn hand wheel again by hand so that needle goes into second hole, readjust stitch width if necessary. Stitch a number of times, turning hand wheel manually. Finish sewing with an extra 2 inches of thread, draw thread to reverse side and tie securely.
If using a 4 hole button repeat the above procedure.
NOTE: To make a small thread shank when sewing on a flat button, place a straight pin or needle between the holes of the button.
We carry more Kenmore sewing machines manuals here.
Add a review
Currently, we are not accepting new reviews
Reviews
There are no reviews yet