

Singer 2010 Touch Tronic Sewing Machine Instruction Manual
$4.99
This is a download manual. Please check your email after purchasing.
Description
Singer 2010 Touch Tronic Sewing Machine Instruction Manual.
Includes:
Threading your machine.
Choosing needles.
Winding bobbin.
Stitch selection.
Needle thread tension.
Low bobbin indicator.
Changing needle plates.
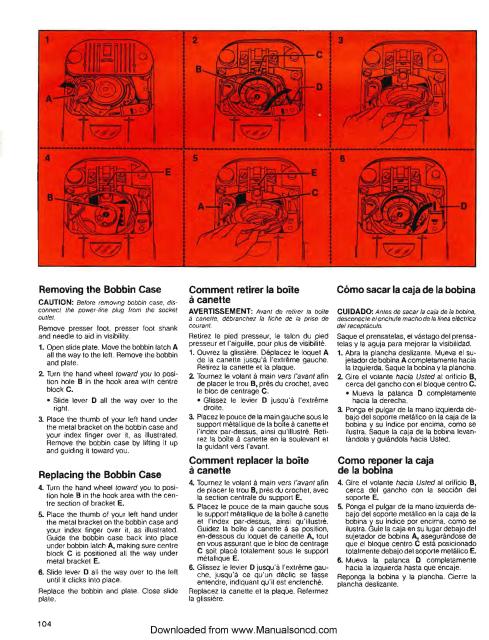
Removing the bobbin case.
Zigzag stitching.
Decorative stitches.
Buttonholes.
Stitch applications.
Sewing a seam.
Chain-stitching.
Keeping seams straight.
Reinforcing end of seam.
Applications.
Quilting.
Free-Arm sewing.
Accessories.
Performance checklist
Much more.
111 page instruction manual.
This model is from the late seventies.
English, Spanish, French languages.
PDF download
Singer 2010 Touch Tronic Sewing Machine Instruction Manual
You can find additional Singer user manuals in our shop.
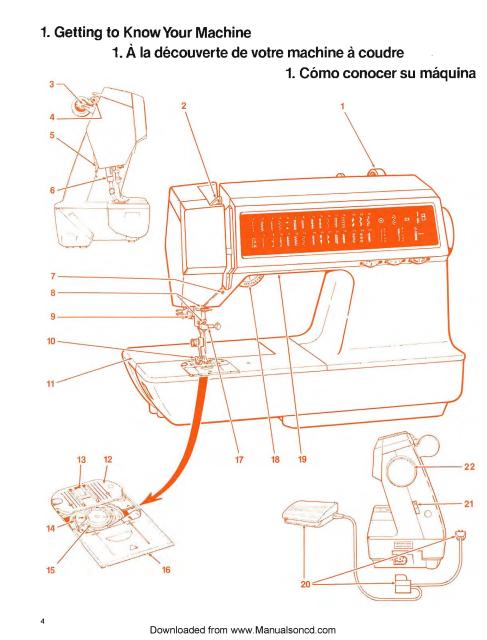
Choosing needles
The needles you use should be straight to ensure perfect stitch formation. The needle should also be fine enough to prevent the fabric from being marred with large punctures, yet heavy enough to pierce the fabric without being bent or deflected. The eye of the needle must be large enough for the thread to pass through freely, too find a needle will cause the thread to fray.
For general-purpose sewing in a wide range of fabrics, the Style 2020 needle in sizes 9 through 18, will give you excellent results.
To obtain best results when sewing on knits, woven stretch fabrics, bonded vinyls and elastic use Style 2045 ballpoint needle, available in sizes 9, 11, 14 and 16.
For decorative stitching on light and medium-weight woven and knit fabrics, use the twin needle Style 2025.
Sewing leathers, real and simulated, the Style 2032 needle works well.
Refer to the Fabric, Thread and Needle table for correct needle and thread for your fabric.
Changing the needle
Disconnect the power line plug from the socket outlet before changing needles.
Raise needle to its highest position by turning the hand wheel toward you.
Loosen the needle clamp screw and remove the needle.
Insert new needle up into the clamp as far as it will go, with the flat side of the needle to the back.
Tighten needle clamp screw
We also carry the service manual for this machine here.
1 review for Singer 2010 Touch Tronic Sewing Machine Instruction Manual
1-1 of 1 review
Add a review
Currently, we are not accepting new reviews
Excellent customer service, fast delivery, very affordable.