
Singer 533 Stylist Sewing Machine Instruction Manual
$4.99
This is a download manual. Please check your email after purchasing.
Description
Singer 533 Stylist Sewing Machine Instruction Manual
Includes:
Threading your machine.
Winding bobbin.
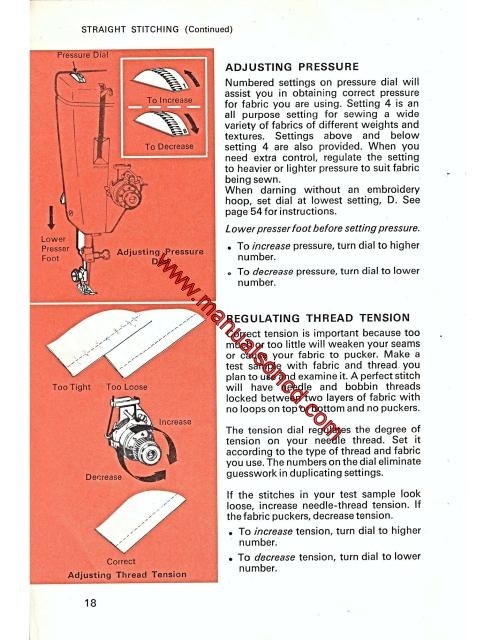
Adjusting thread tension.
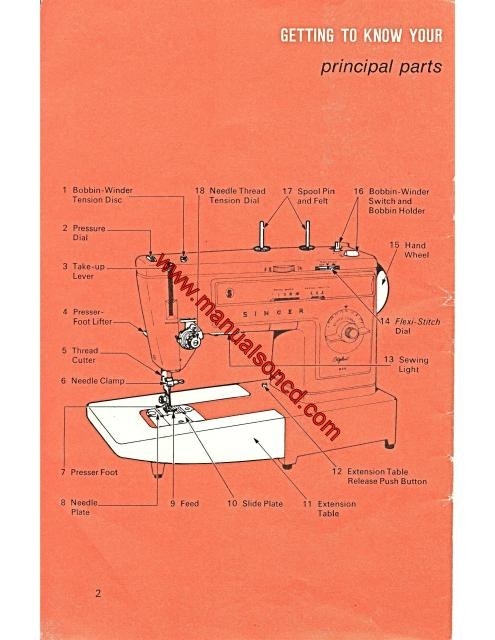
Principal parts and what they do.
Accessories and when to use them.
Choosing needle and thread.
Stitch applications.
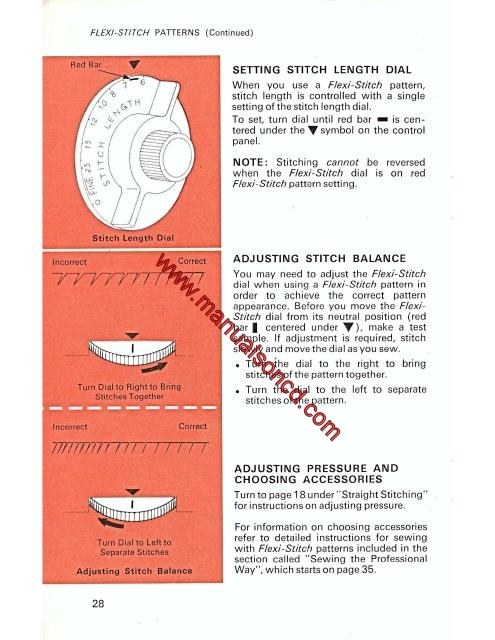
Flexi-Stitch disk patterns.
Free-arm sewing.
Zigzag sewing.
Cleaning the machine.
Much more.
65 page instruction manual.
Singer 533 Stylist Sewing Machine Instruction Manual.
Feed-Cover Needle Plate
The feed-cover needle plate is used in place of the general purpose needle plate when fabric feeding is not desired. Use it for button sewing and free motion darning.
Changing Needle Plate
1. Raise presser foot. You do not need to remove the foot.
2. Turn hand wheel towards you until the needle is at its highest position.
3. Open slide plate with downward finger pressure. Draw plate towards you, opening it all the way to raise the needle plate locking pin and unlock the needle plate.
4. Place thumb under needle plate and draw plate to the right to remove.
5. Insert new needle plate under a locking pin and over positioning pin.
6. Close slide plate to lower locking pin and secure the needle plate.
Changing Presser Feet
The presser feet that are supplied with your machine snap on and off a common shank.
To change the foot:
1. Raise presser foot lifter and turn hand wheel towards you to raise needle to its highest position.
2. Press toe of presser foot upward as far as it will go and then snap down to remove the foot.
3. Center the new presser foot under the shank and lower the presser foot lifter so that shank fits over the presser-foot pin.
4. Press down on presser foot screw until foot snaps into place.
Needles
Style# 2020 needles for all-purpose sewing.
Style# 2045, ballpoint yellow band, for sewing knits and stretch fabrics.
Style 2028, twin needle, or decorative twin needle sewing.
Changing The Needle
The needle clamp is designed so that the needle can only be inserted with the flat side of the needle to the back of the machine.
To change the needle:
1. Raise the needle bar to its highest position, loosen needle clamp screw, and remove needle.
2. Insert new needle in clamp, with the flat side of the needle to the back push it up as far as it will go.
3. Tighten needle clamp screw.
We also carry the service manual for this machine here.
Add a review
Currently, we are not accepting new reviews
Reviews
There are no reviews yet